Spring Focaccia Art
Happy Spring!!
The sun is shining, the birds are chirping and the earth is waking up after a long and challenging winter. Are you feeling it?
What better way to celebrate than getting creative and playing with dough to create a fun piece of spring food art with your kids. This is a great way to explore the feelings and themes of the season and it’s also a terrific way to give kids exposure to different foods. Playing with food without pressure to eat it usually helps kids feel more comfortable around foods when they encounter them at mealtimes.
Bonus: this is a great way to spend time together if you’re just embarking on school break!
You don’t have to make this focaccia dough from scratch. This would work just as great with a prepared pizza dough from the store. You could even just top some puffy pita bread with veggies and give it a quick warm up in the oven if your kids just want to focus on the decorating bit. If you want to make your own, here’ s a simple focaccia recipe from Alexandra Cooks:
I’ve simplified things here, but check out the original recipe for more details. Generally, this type of recipe recommends making the dough the night before and letting it chill in the fridge overnight. This helps develop the flavour and texture. If you don’t want to do that, no worries - you can make it all on the same day!
Ingredients:
4 cups all purpose flour, spooned and levelled
2 teaspoons kosher salt
2 teaspoons instant yeast
2 cups lukewarm water
2 tablespoons plus 4 tablespoons olive oil, divided, plus extra for brushing
flaky salt
Directions:
The night before you want to make your focaccia:
Mix together the flour, salt and yeast in a large bowl.
Add the water and 2 tablespoons of the olive oil and stir til all the flour is incorporated and it forms a shaggy ball of dough. If necessary, add more water, 1 tablespoon at a time til it comes together..
Cover with a damp towel or plastic wrap and put in the fridge for 12 hours, or overnight. If your house is cool, you can leave it out on the counter.
The next day:
The dough will be very wet and bubbly, and will have risen up in the bowl.
Drizzle two 9-inch round pans or one 9 x 12” baking pan with the rest of the olive oil, and use your hands to cover the bottom and sides of the pan. Make sure the pan is well coated and your hands get covered in oil!
If you’re making two focaccias, separate the dough into two equal parts. Otherwise gently turn the dough out with your oiled hands and spread it in the pan.
Let the dough rest for a few minutes - this will make it easier to stretch.
Keep gently stretching the dough until it reaches the edges of the pan.
Let the dough rest for an hour in the pan - this is a great time to prepare the veggie “decorations.”
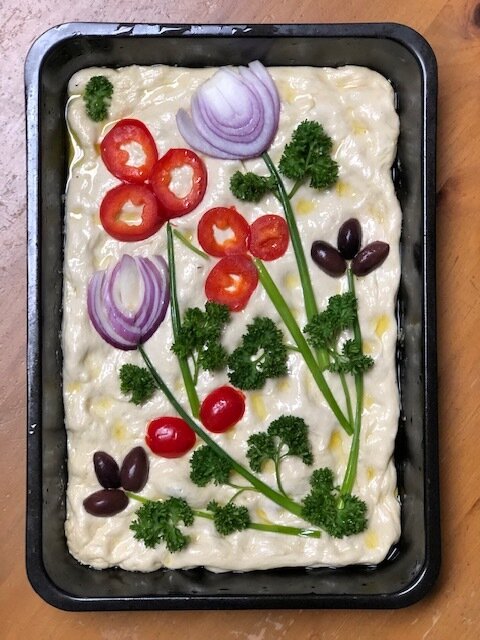
Veggie decorations - anything goes, but here are some to get you started:
sliced peppers in different colours (petals, butterflies)
purple onion slices (flowers)
green onions or chives (stems)
parsley stems & leaves (branches & leaves)
basil leaves
olives
cherry tomatoes
Once the dough is puffed up, poke your fingers into it and drizzle with olive oil - kids will love doing this! Notice the amazing feeling and texture, and how the dough reacts to being poked! It’s ok to have little puddles of oil on top!
Let everyone choose from the veggie pieces and decorate the dough to create a spring scene. Just poke the veggies into the surface of the dough. While you’re doing this, preheat the oven to 425 degrees.
When you’re all done, brush the whole thing with a bit more olive oil and sprinkle the top with a bit of flaky salt.
Bake for 20-25 minutes, until the focaccia is puffed up and golden on top. Watch through the oven window and marvel at the way it changes during baking.
Remove from the pan and cool for a bit on a wire rack. Admire your work of art, then dive in and enjoy while warm!
I’d love to see your focaccia art if you make this! Take a picture and share it on social media - be sure to tag us @rainbowplate and #myrainbowplate!